
The Enduring Fascination with the Night Sky: An Astrophotographer’s Journey Through Technique and Technology
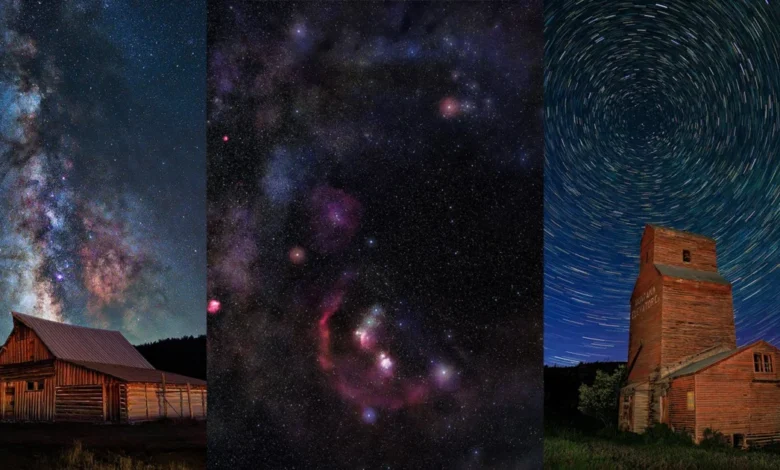
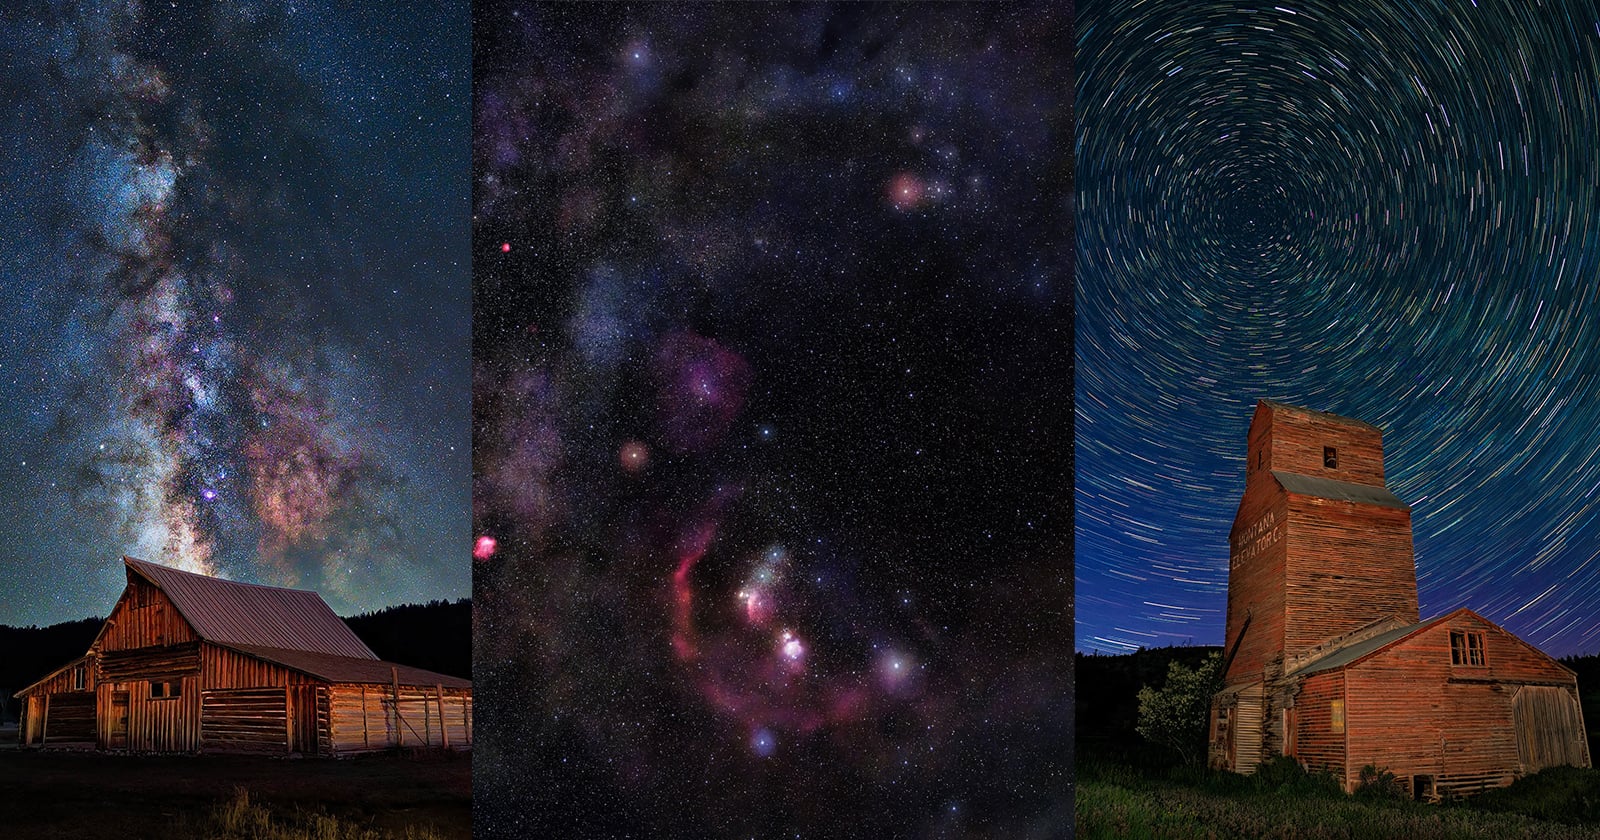
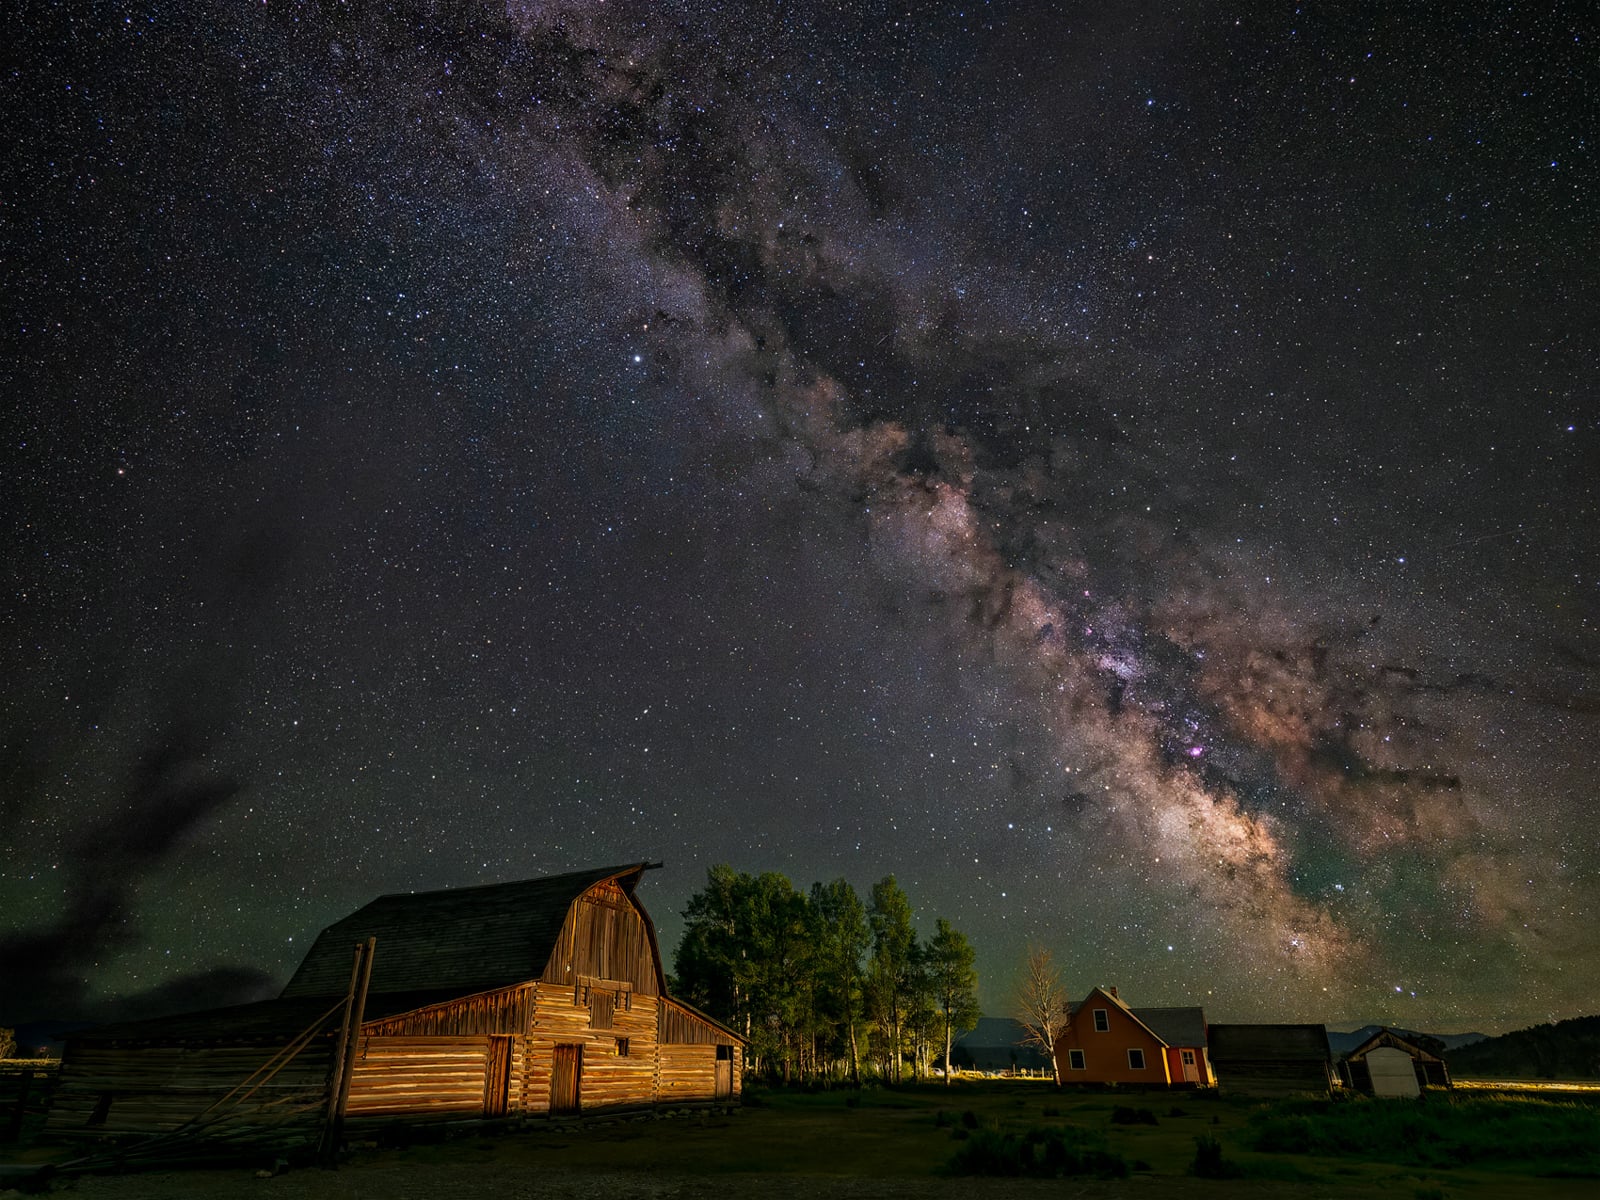
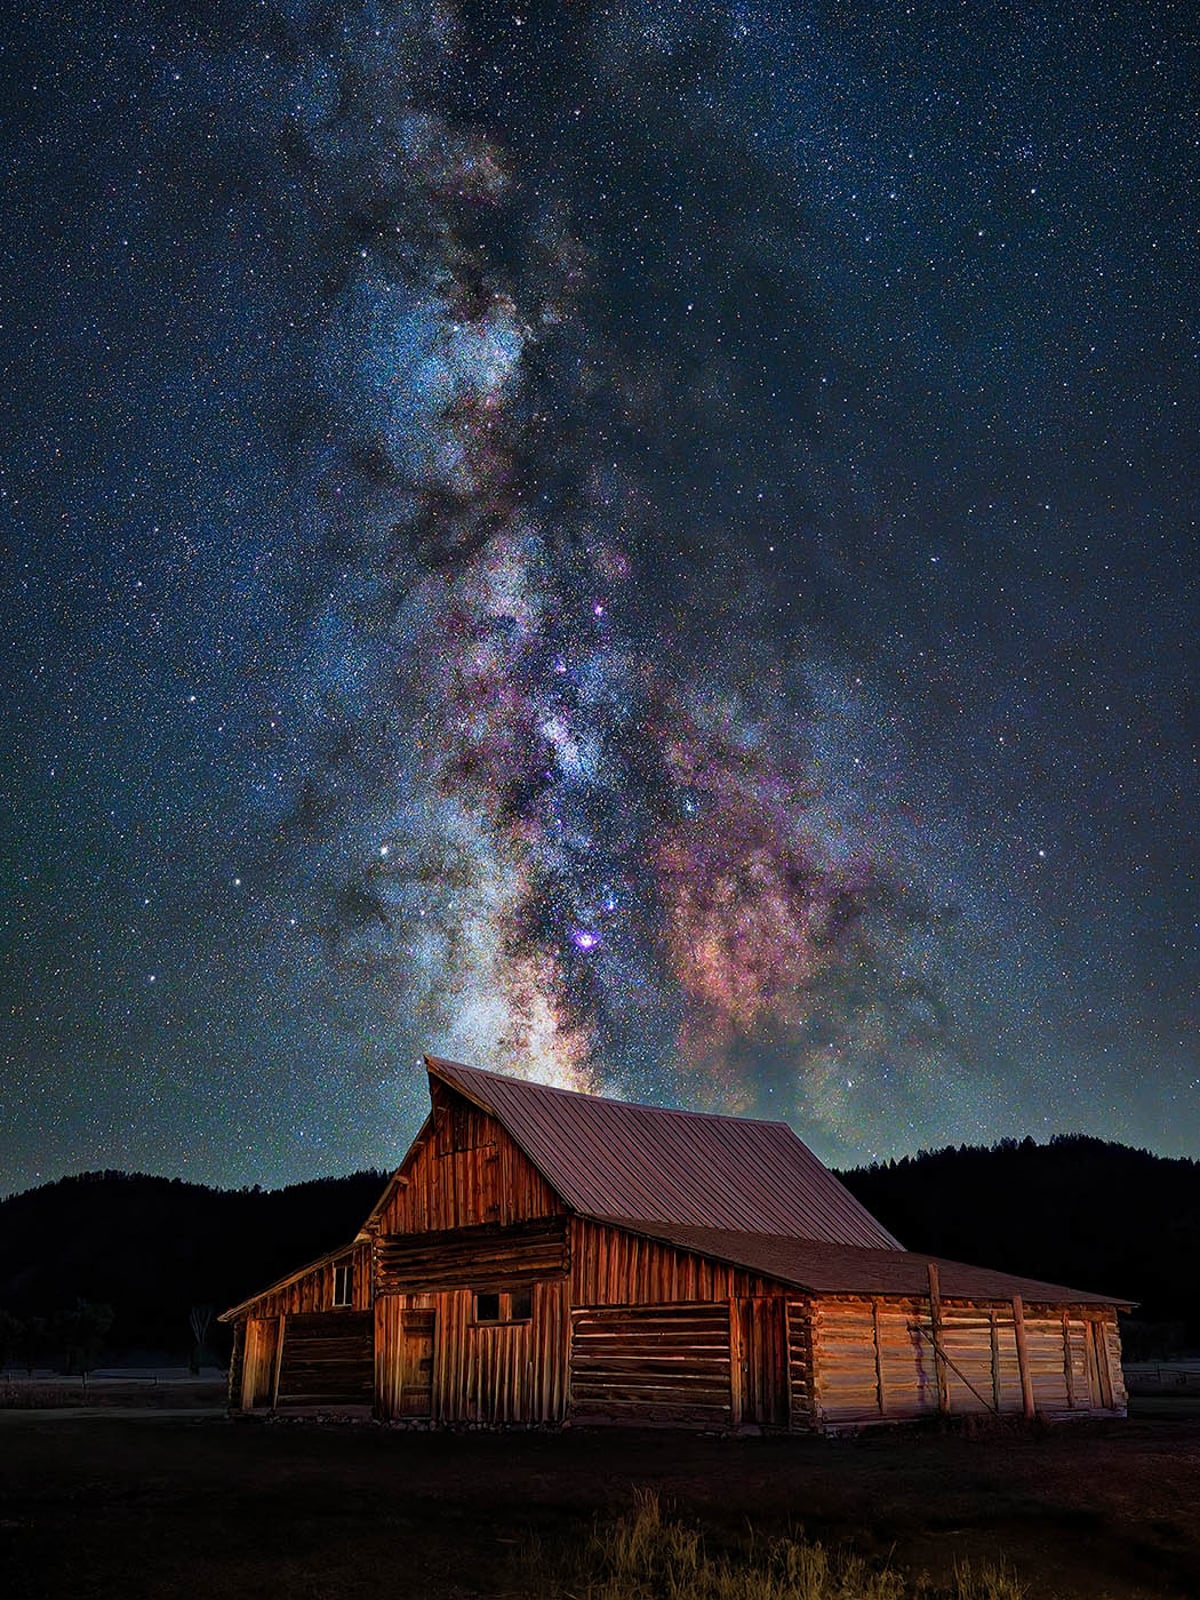
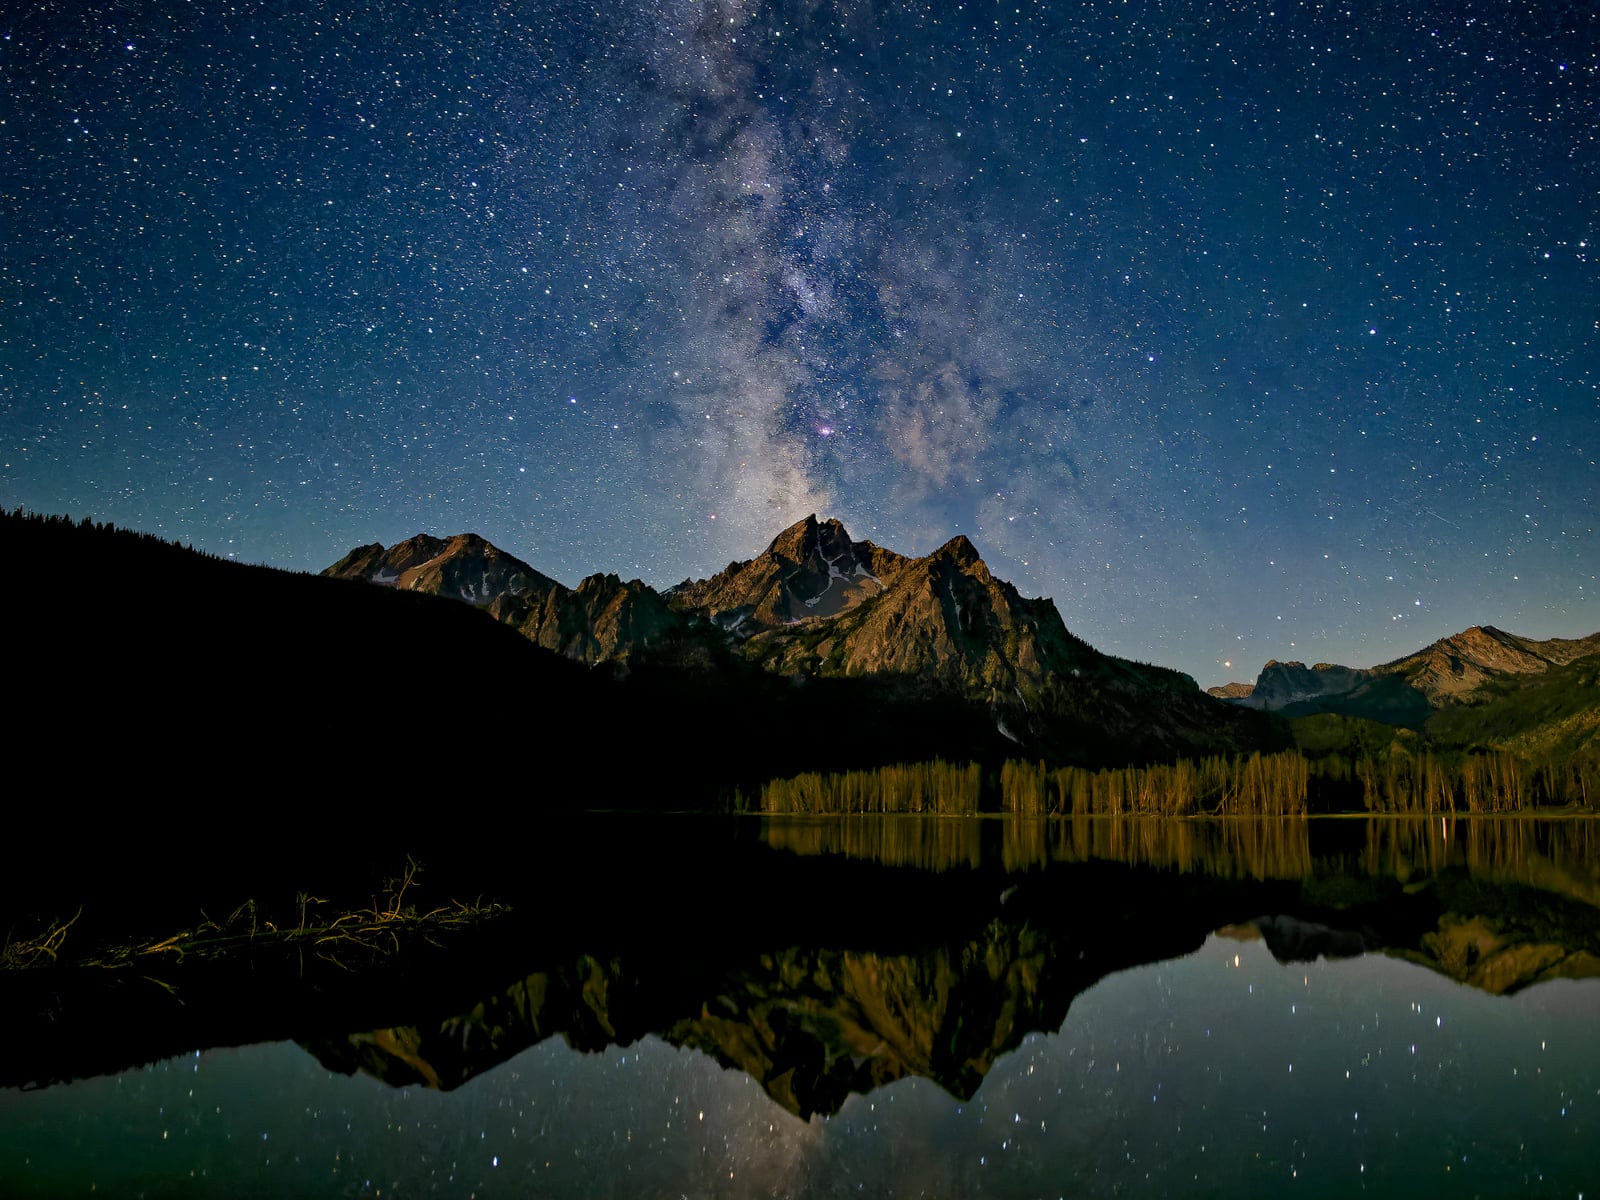
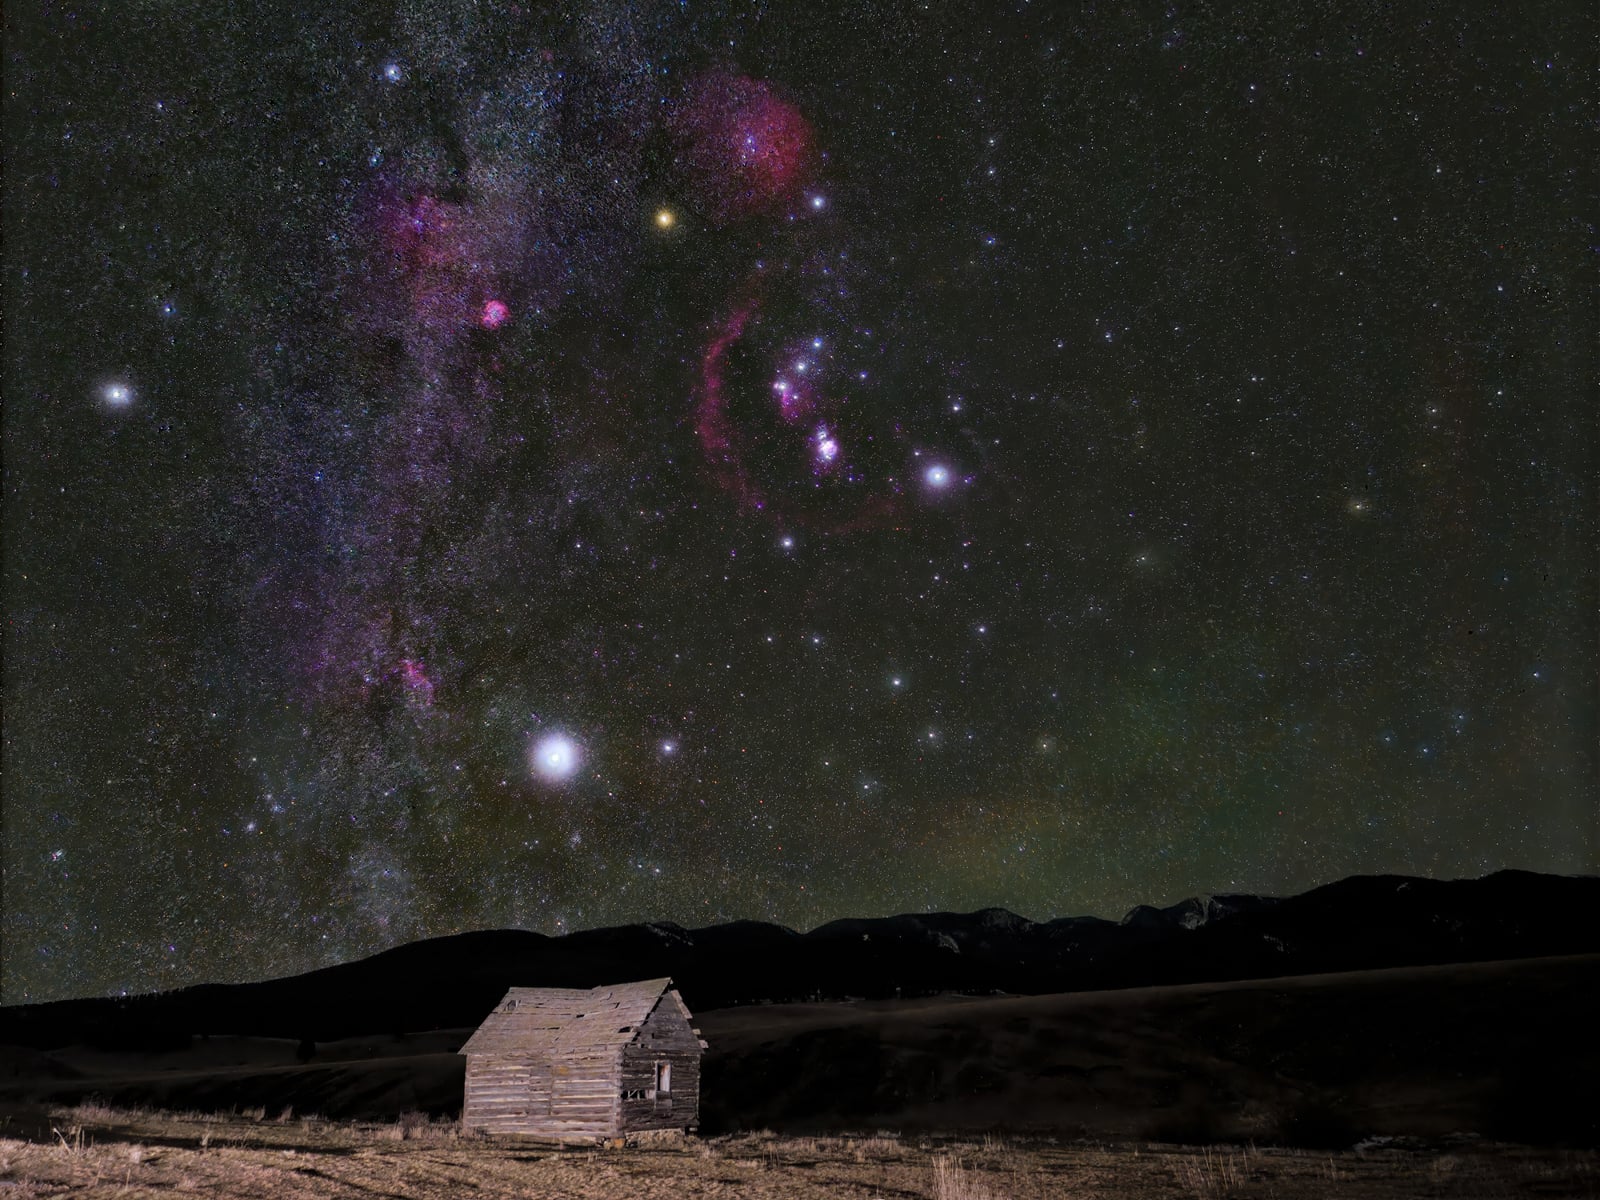
Photographer Matt Suess, an OM SYSTEM Ambassador, was deep into a 45-minute star trail exposure in Joshua Tree National Park when a faint, hazy band materialized across the celestial canvas. Having grown up in light-polluted New England, where the Milky Way remained an elusive spectacle, Suess was initially unfamiliar with the phenomenon. He promptly turned his camera towards it, capturing what would become his first photograph of the galaxy. The resulting images, however, lacked the crispness he desired. Decades of nocturnal photography have since taught him that such lessons are best learned through hands-on experience.
This article was brought to you by OM SYSTEM.
From Engineering Dreams to Celestial Pursuits
Suess’s journey into astrophotography began long before his Joshua Tree revelation. He established his first darkroom at the tender age of 12 and as a teenager in Connecticut, he was already experimenting with star trail photography on color slide film. His profound interest in the cosmos even steered him toward a degree in mechanical engineering, fueled by a childhood ambition to design rockets for NASA. While a career in aerospace engineering didn’t materialize, his passion for the night sky endured. Today, Suess leads specialized night sky photography workshops, guiding aspiring photographers through challenging environments from the Grand Tetons to the arctic reaches of Norway. He immerses his students in conditions most have never encountered, fostering a deep appreciation for the nocturnal world.
Reflecting on his formative experience, Suess shared with PetaPixel, "I remember what I was feeling when I saw the Milky Way for the first time in Joshua Tree. I couldn’t believe what I was looking at. I just stood there staring at it. A lot of people who attend my workshops experience that same moment of seeing a truly dark night sky for the first time. Watching them see it with their own eyes and then helping them photograph it, that’s a reward that never gets old." His most impactful teachings, he emphasizes, stem not from manuals but from countless nights in the field, troubleshooting and refining his craft.
The Art of Asking the Right Questions in Astrophotography
A common hurdle for semi-experienced astrophotographers is not a lack of equipment, but rather the tendency to ask the wrong questions. The query, "Do I need a better camera?" often marks an unproductive starting point. Suess advocates for a more diagnostic approach: "The real question is what’s actually limiting your shots," he advises his workshop attendees when they inquire about upgrading their gear. He elaborates, "If you’re not getting sharp stars, it could be focus technique, wind on a lightweight tripod, or a lens that’s too slow or soft for the conditions. A lot of photographers upgrade bodies when what they actually need is a faster prime or a more stable tripod."
A pivotal moment in Suess’s photographic evolution came not from a photography guide, but from a workshop participant. This individual was experimenting with a feature that allowed real-time star trail visualization directly on the camera’s display, a technique Suess had previously achieved through extensive post-processing. This discovery of the OM SYSTEM’s Live Composite mode revolutionized his perspective on the in-camera capabilities for astrophotography. "That’s still how I think about gear decisions," he notes. "Before I recommend anything to a student, I ask them: have you tried every feature and setting in your current camera? Have you tried astrophotography with different lenses? Most people haven’t experimented. They’ve used maybe 30% of what they already own."
Maximizing Your Existing Kit Before Investing in New Gear
Understanding the full potential of one’s current equipment is paramount before considering new purchases. This includes not only mastering the functions of existing gear but also understanding which accessories are essential for night sky photography. Suess stresses the importance of a lightweight setup for increased portability and ease of use in the field. His personal kit includes the OM-1 Mark II and OM-5 Mark II, fast prime lenses, and a star tracker for deep-sky imaging. "The heavier the gear, the less you bring, and the more you wish you had out in the field. A lightweight setup that works for you will help you take better images and enjoy your time under the night sky," he asserts.
One of the most frequent pieces of advice Suess imparts to his students revolves around a fundamental astrophotography technique: the 500 Rule. This guideline suggests dividing 500 by the 35mm equivalent focal length of your lens to determine the maximum shutter speed before star trails become noticeable. However, Suess prefers a more empirical approach. "I prefer not to do math out in the field. I’d rather take a test shot, see if the stars are sharp, and adjust the exposure time from there." This hands-on method, refined through experience, allows him to intuitively understand the optimal exposure times for his preferred lenses.
Among his collection, the M.Zuiko Digital ED 17mm F1.2 PRO lens holds a special place for nocturnal endeavors. "The M.Zuiko Digital ED 17mm F1.2 PRO is what I reach for most nights when I’m chasing the Milky Way," Suess reveals. "At 34mm equivalent, it’s wide enough to frame the Milky Way’s arc with meaningful foreground, but not so wide that the stars stretch at the edges. F1.2 lets me drop my ISO by a stop or more compared to an F2 lens, which translates directly to cleaner stars and less noise in the RAW file. Fast glass is what separates a usable wide-field astro shot from a soft, noisy one. That lens stays on one of my cameras more than any other."
Mastering Focus for Pin-Sharp Stars
Achieving precise focus on stars is a critical yet technically demanding aspect of astrophotography. Suess typically guides his students through a manual focusing process: "You put the camera in live view, increase the magnification, and find the brightest star near the center of your frame. Take the manual focusing ring and rotate it back and forth. You’ll see the star get big and soft, like a golf ball, and then tiny. You keep making smaller increments, zeroing in until that star is at its smallest point. Tape down the focusing ring, and hope that focus stays throughout the night."
While this manual method is effective, it requires patience and stable conditions. Temperature fluctuations, accidental bumps to the tripod, or even minor adjustments to framing can subtly shift focus, leading to less-than-ideal star sharpness. For beginners, this can mean a night of compromised images.
OM SYSTEM’s innovative Starry Sky AF feature offers a streamlined solution. This technology automates the focusing process, allowing the camera to lock onto a star with a single button press. "It’s almost like cheating," Suess admits. "I watch the camera do basically the same technique I’d been doing manually. The stars get bigger and softer, then smaller, and then it just locks in. Done. For me, and especially for my clients that have a camera with Starry Sky AF, it takes all the guesswork out of focusing on the stars so they can focus on getting the right exposure and the right composition."
Anticipating the Unexpected: Preparing for the Unforeseen
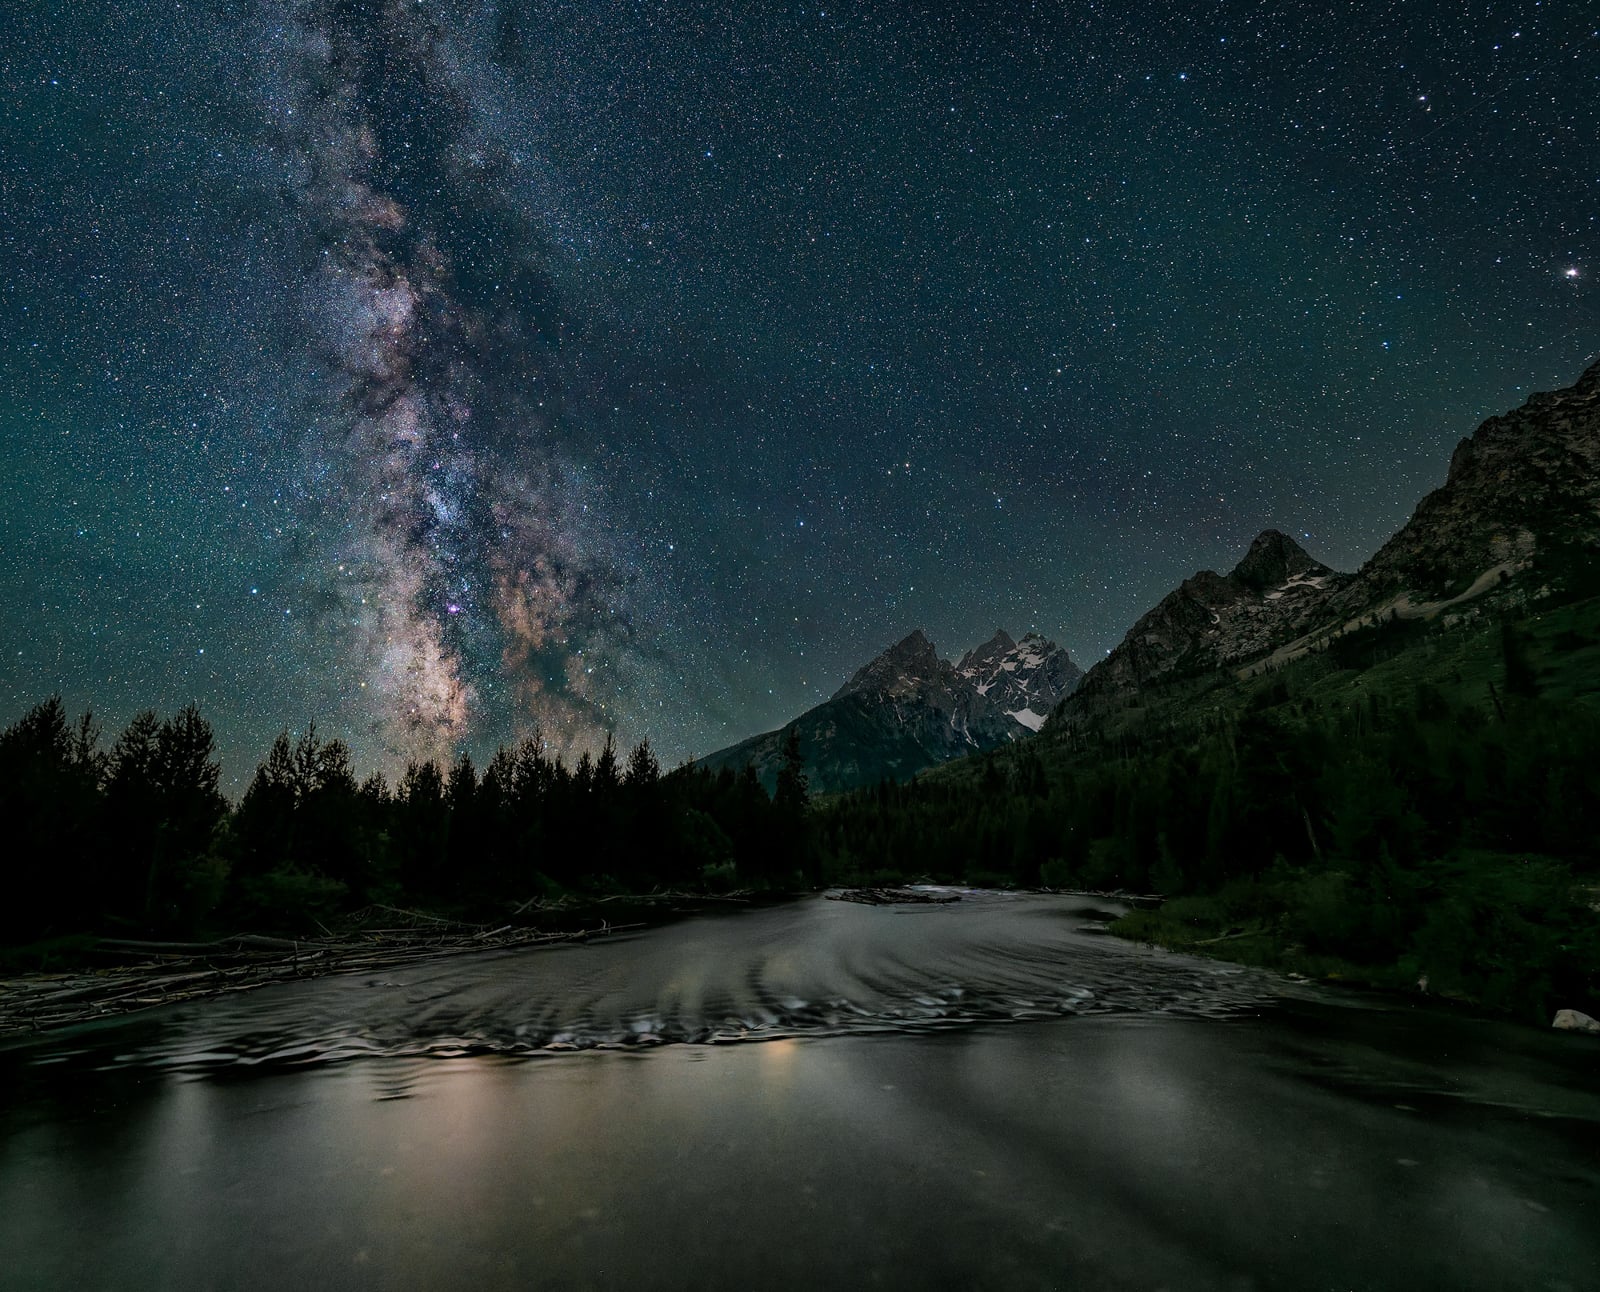
Comprehensive astrophotography workshops often begin with technical camera settings, but Suess prioritizes understanding the environment. "Number one: clouds," he states. "If you’ve got clouds, you usually don’t have a nice shot, unless there are some breaks in the clouds somewhere. I photograph a lot in the Tetons and we get sudden storms. You can look in one direction and see clear skies and in the other direction, it’s gray and raining. So keeping an eye on the weather and being prepared to pivot locations is critical." He relies on weather forecasting apps like Weather Mate and Windy to monitor atmospheric conditions and make informed decisions about location scouting.
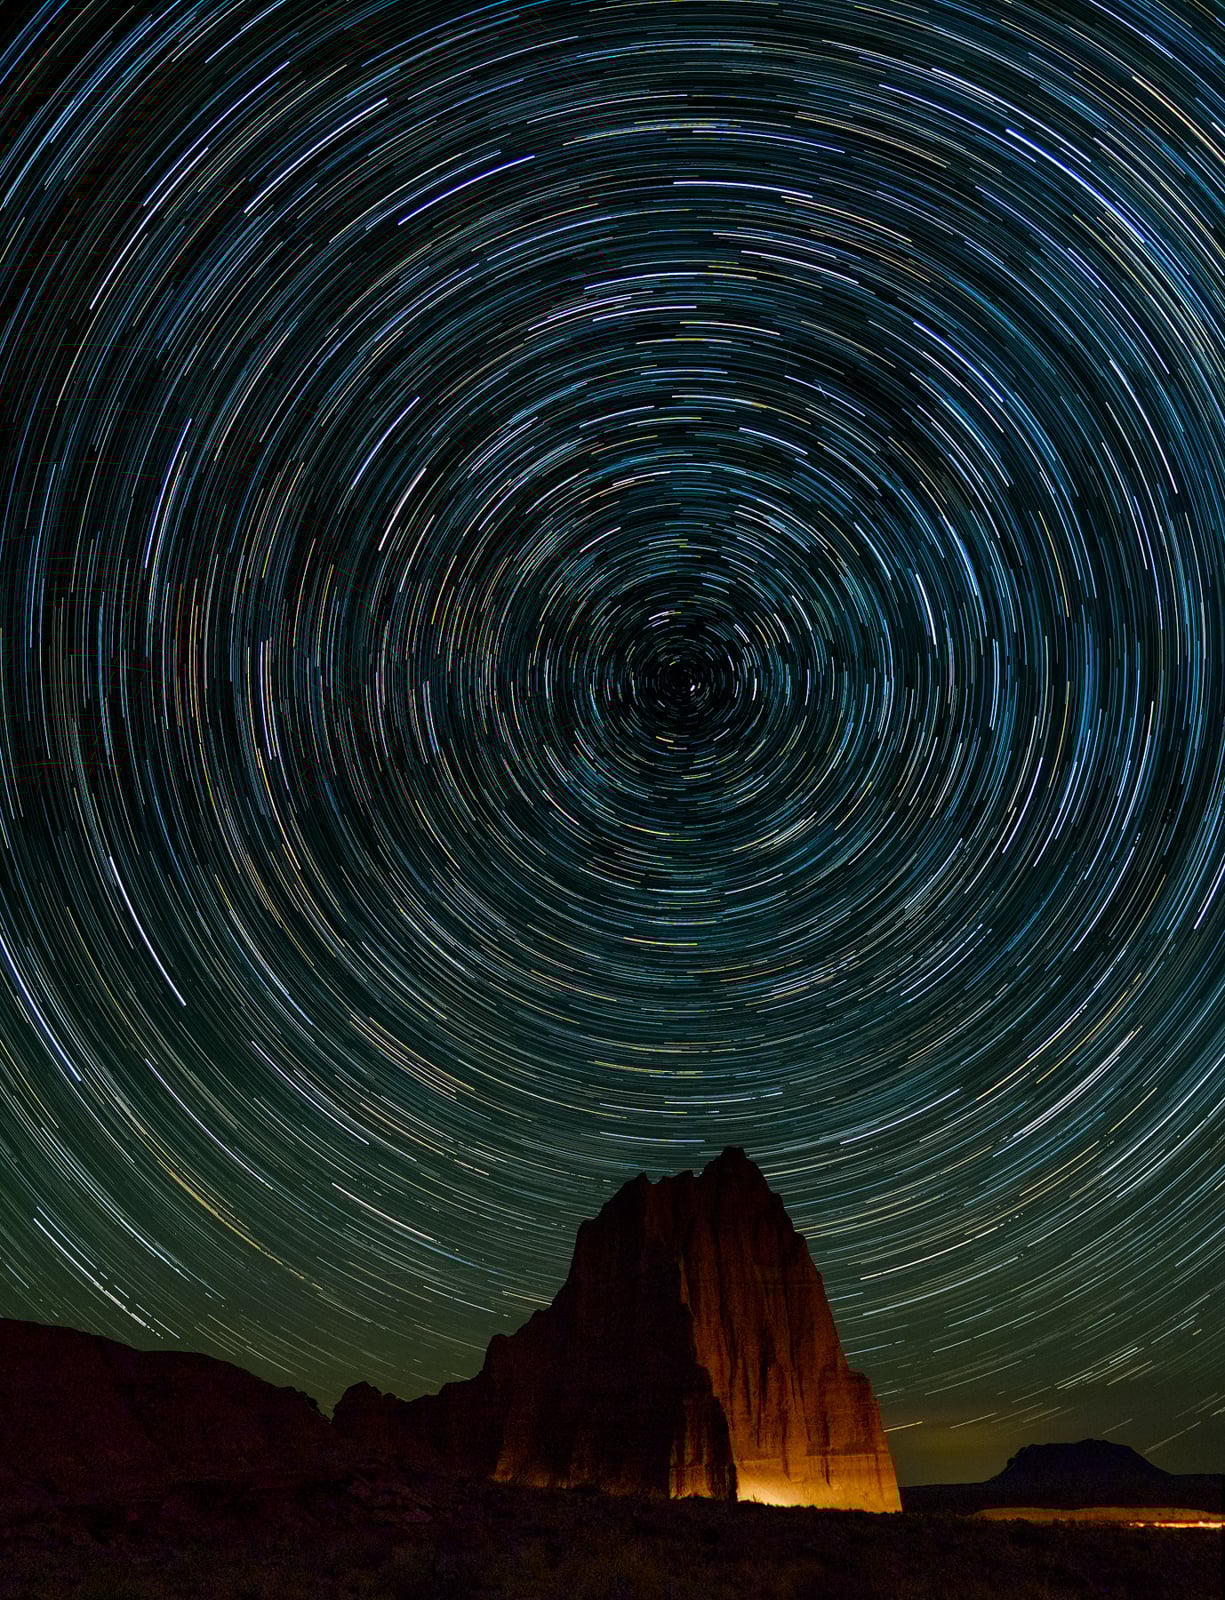
The unpredictable nature of weather necessitates a flexible approach. "I always recommend being ready to change plans," he advises. "Time with ideal darkness for stars is limited, so a great plan B astro shot is better than no shot at all." Beyond weather, the biting cold can significantly impact shooting time. Suess learned this lesson firsthand, noting, "I’ve done shoots where 42 degrees felt manageable on the drive out. But, after two hours into a Live Composite star trail, standing in one spot, not generating any heat, I was shaking. If you’re not moving much, it feels a lot colder than what the temperature is reading. I have learned to dress two layers warmer than the forecast."
Wildlife encounters also present a unique set of challenges in remote locations. "Animals are always a concern," Suess stresses. "I’m photographing in landscapes with bears, moose, and bison. In the desert, I’ll bring a black light to see if there’s any scorpions on the ground. I always recommend doing research on wildlife in any location you’re visiting, because the best conditions for astro photography, darkness and remote nature, are also prime conditions for dangerous animals."
While many photographers avoid shooting under a partial moon, Suess views these nights as opportunities for composite imagery. "For the darkest skies, I recommend shooting four or five days around the new moon," he suggests. "That guarantees completely dark skies and the best view of the Milky Way. But even on nights with a half or three-quarter moon, as long as that moon is still below the horizon, you can shoot astro. If the moonrise is 45 minutes to an hour away, you’ve got a solid dark sky window. Photograph your dark sky first, keep your tripod and camera in the exact same position, and then when the moon comes up, let it light your foreground. Get both images and blend them in Photoshop later." He utilizes apps like PhotoPills to precisely track twilight phases, understanding that "pure dark is when the sun is 18 degrees below the horizon and there’s no ambient illumination left in the sky. That’s when you get the most out of the Milky Way."
A often-overlooked pre-shoot check involves adjusting the camera’s display brightness. "There’s nothing worse than reviewing your shots through the viewfinder when it’s bright and walking away with your eyes ruined for the dark sky," Suess notes. "It’s not just about night vision, either. If you have the brightness up, your photo’s going to seem a lot brighter than it actually is, which can lead to disappointment when you see the RAW file on your computer. You should always be relying on the histogram for the truth."
The Power of Star Trackers and the Patience to Learn
Star trackers, motorized mounts that synchronize with the Earth’s rotation, are invaluable for deep-sky astrophotography. They enable significantly longer exposure times, revealing intricate details and colors otherwise imperceptible. However, beginners often underestimate the weight limitations of these devices. "On a portable tracker like the Move Shoot Move NOMAD, the motor can only handle so much weight," Suess warns. "Bigger trackers with counterweights will handle heavy glass just fine, because the counterweight balances the load on the motor. But on a rig without that option, the lighter your camera and lens, the better it tracks. That’s where the lightweight Micro Four Thirds system has a real practical advantage."
For his deep-sky work, Suess pairs the Move Shoot Move NOMAD with the M.Zuiko Digital ED 50-200mm F2.8 IS PRO lens and the M.Zuiko Digital 1.4x Teleconverter MC-14, a combination that maintains a manageable weight for stable tracking. It’s important to note that trackers are primarily designed for deep-sky imaging; while wide-angle shots are possible, foreground elements will blur due to the mount’s movement. This necessitates separate exposures for the sky and foreground, which are then blended in post-processing.
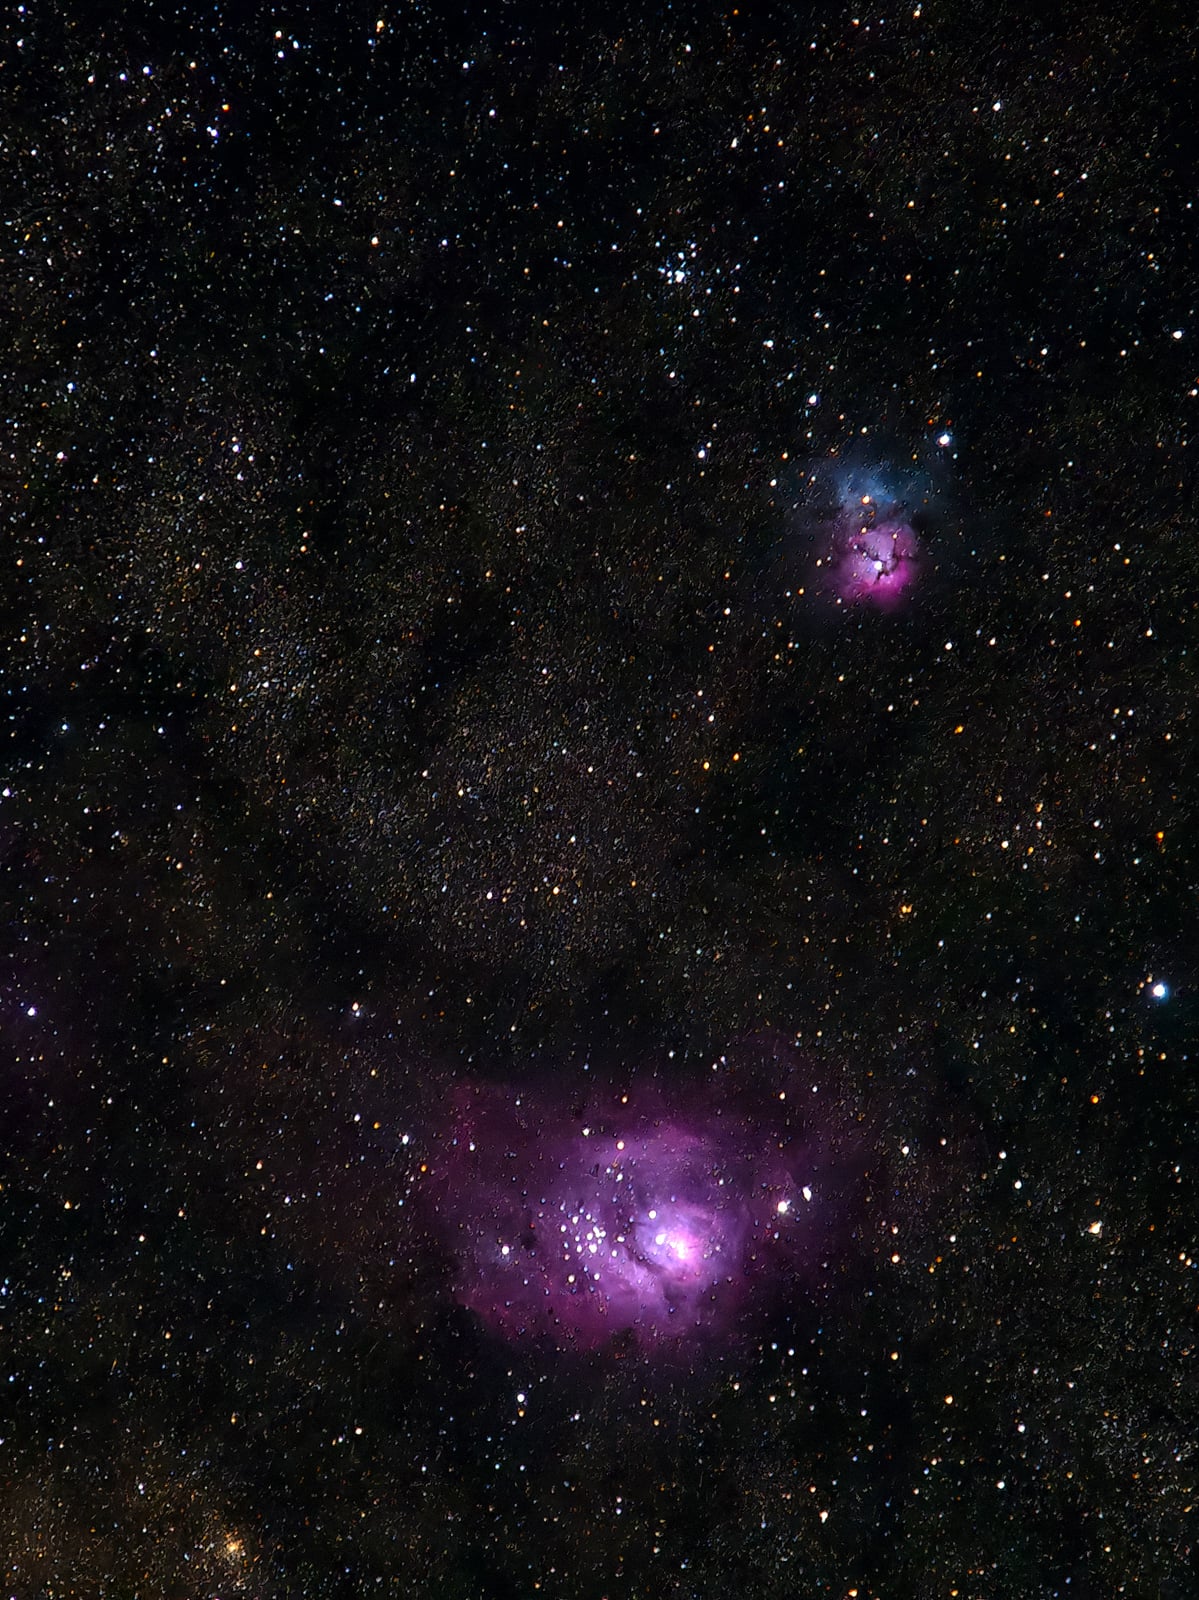
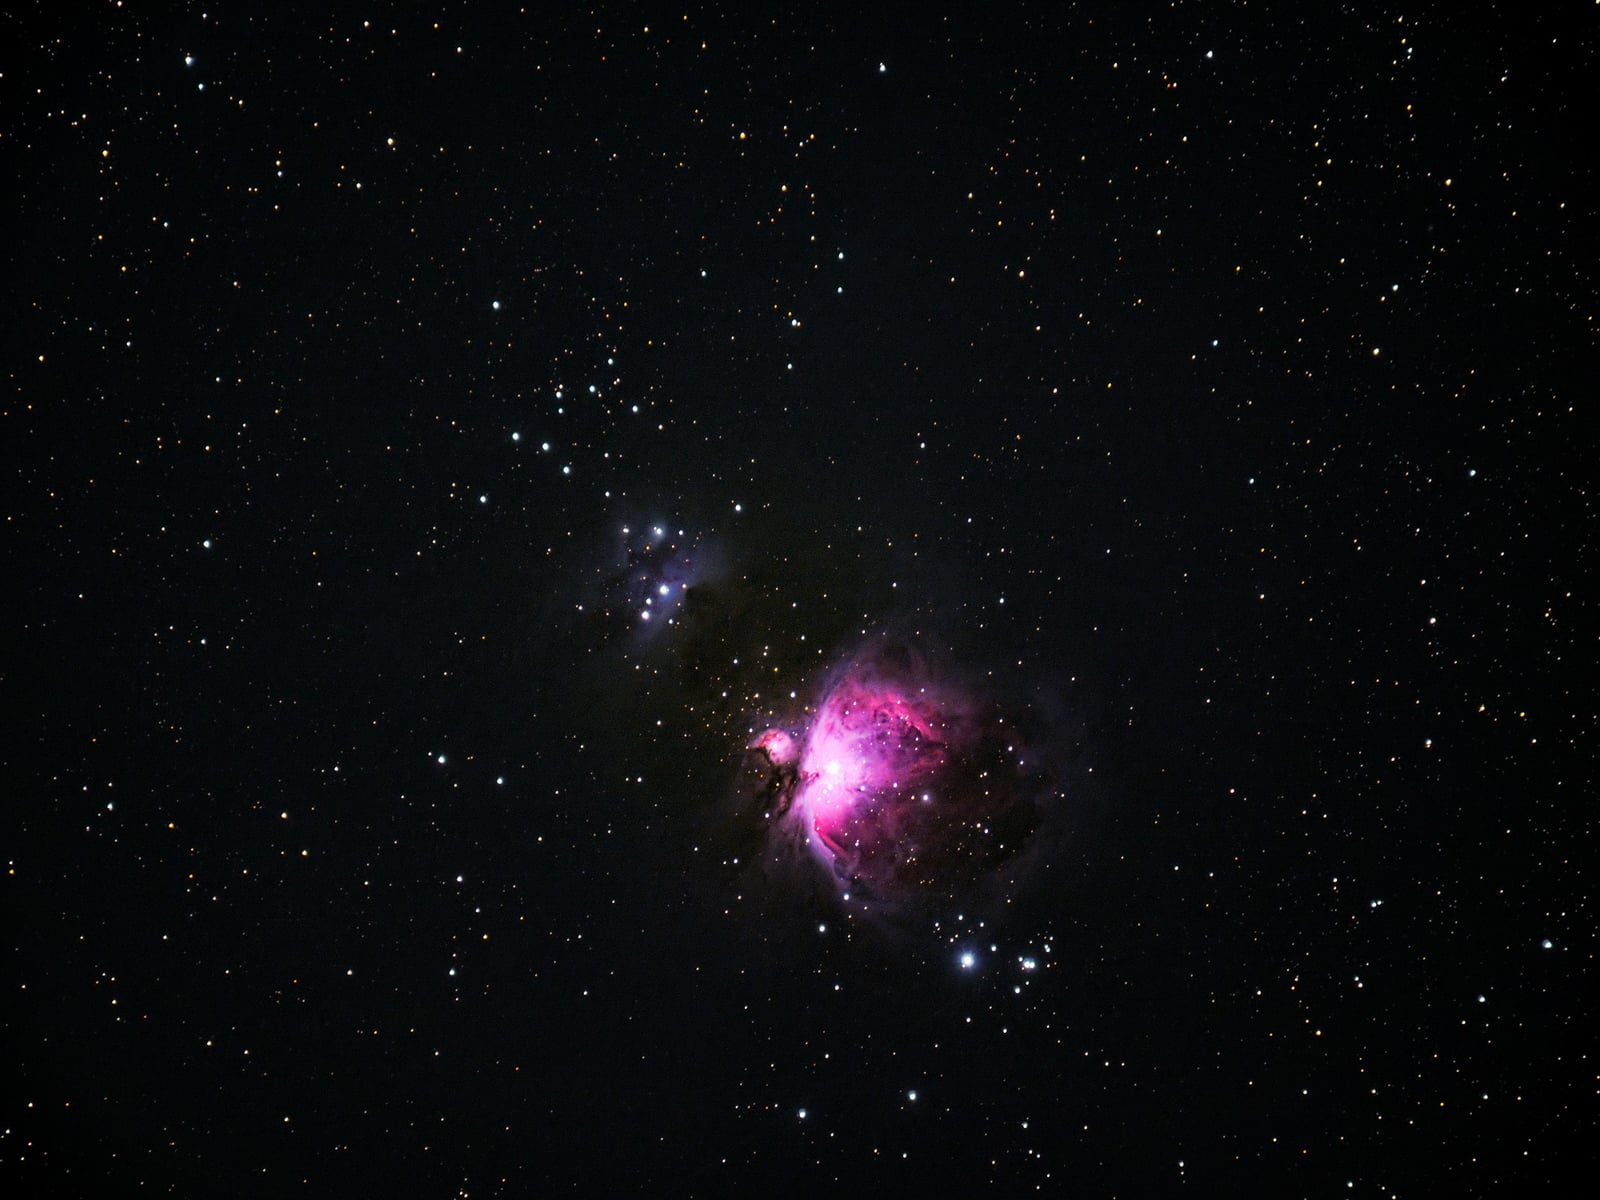
Suess candidly admits that deep-sky photography presents ongoing learning opportunities. "I’m not an expert on deep sky photography, and I don’t know if I ever will be," he confesses. "And that’s ok, because I am really enjoying the learning process and I love creating something different than my usual Milky Way shots. Once I got that first exposure of the Andromeda Galaxy, I was hooked. I was surprised I could get that much detail out of a single exposure. The Orion Nebula in winter has also become an instant favorite."
A common stumbling block for new tracker users is polar alignment, the precise orientation of the tracker’s axis towards the celestial pole. "Getting polar alignment starts with finding Polaris in the polar scope, and the first thing that throws people off is that the view is upside down," he cautions. "Then you’ve got trees to contend with. The North Star is in a fixed position, and if there’s a tree in between you and the North Star, you’ve got a problem. And even when you think you’ve got it, you’re asking yourself, did I align on the right star? There are a lot of stars up there."
Maintaining alignment is another challenge. "I can’t tell you how many times I’ve gotten polar alignment and then accidentally kicked my tripod leg," he stresses. "Or you get it dialed in and then put a heavier lens on and one of your tripod legs sinks a little. You need a lot of patience and you need to have some forgiveness for yourself too, because things can and will go wrong." The use of a zoom telephoto lens, such as the 50-200mm, offers an advantage over fixed focal lengths when framing distant celestial objects. "You zoom out wide, take a quick test photo, and you can see where Andromeda sits relative to the surrounding stars. Then you zoom in. With a fixed focal length like a 300, you’re staring through the lens at a field of stars trying to find one specific target. That is difficult."
The Significance of Astro-Modified Sensors
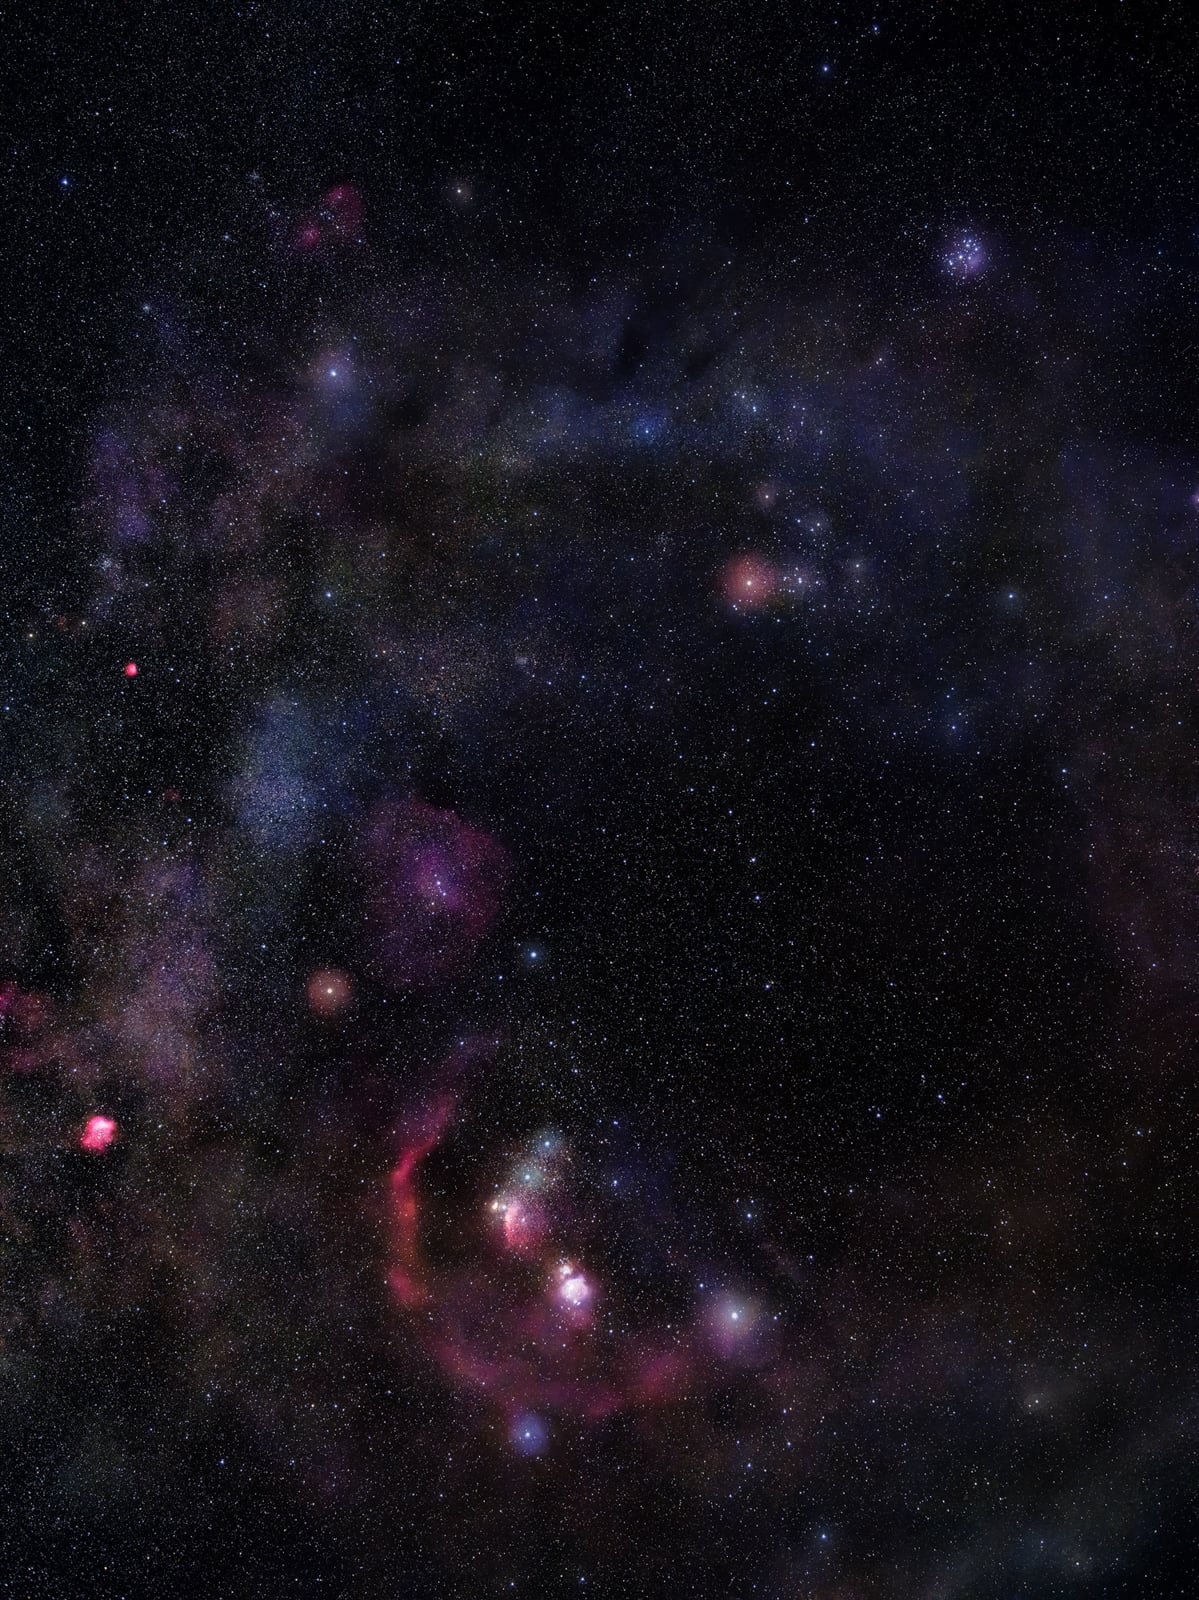
Suess’s introduction to deep-sky photography was through the OM-3 ASTRO, a camera that illuminated a crucial aspect of astrophotography: the sensor’s limitations in capturing specific light wavelengths. Standard camera sensors are equipped with filters that block hydrogen-alpha (H-alpha) emissions, the primary source of the vibrant reds seen in nebulae like Orion. This necessitates either specialized modification services or dedicated astro cameras.
"An astro camera removes that filter, so it captures all of that red light instead of maybe 20% of it," Suess explains. "The difference on something like the Orion Nebula is night and day." The OM SYSTEM OM-3 ASTRO comes factory-modified with a filter that allows full H-alpha transmission, significantly enhancing the capture of nebulae colors. This modification has profoundly influenced Suess’s approach to astrophotography, enabling him to reveal more subtle colors and details within the Milky Way, even with wide-angle lenses.
Harnessing the Histogram for Accurate Exposure

A fundamental principle in astrophotography, as emphasized by Suess, is to "trust the histogram, not the preview." The histogram, a real-time graphical representation of tonal distribution in an image, is the definitive tool for assessing exposure accuracy. Relying solely on the camera’s LCD preview can be deceptive, especially in low-light conditions.
Suess champions a workflow that prioritizes a single, well-exposed frame over numerous weaker ones, particularly for wide-field Milky Way shots. "When you’re only taking one or two, every frame has to be right, and the histogram is how I check. With the noise reduction software we have now, I don’t feel I have to do stacking for those big Milky Way shots." He acknowledges that deep-sky photography, with its emphasis on stacking multiple exposures (lights, darks, flats), is a different discipline that yields greater detail.
For post-processing, Suess employs a multi-stage approach. He begins with DxO PureRAW, a program renowned for its ability to reduce noise in high-ISO files while preserving star detail and lens sharpness. "The first time I compared a high-ISO file processed through PureRAW versus going straight into Lightroom, the difference jumped off the screen," Suess recounts. "It kept the star detail sharp while cleaning the noise. Lightroom was smearing it." Following this, he utilizes Photoshop for high-pass filtering to enhance detail in the Milky Way’s core. The final touches are applied with DxO Nik Color Efex, employing Clearview and Tonal Contrast filters to add clarity and depth.
A common pitfall Suess observes is over-processing, where photographers attempt to extract detail that isn’t present in the RAW data. "What I see is people pulling harder on data that isn’t there," he states. "They stack 50 weak exposures and try to brute-force the processing, and they end up with these mottled-looking nebulae that don’t look real. Start with a stronger single exposure, run it through good noise reduction, and let the data speak for itself. You’ll get a more honest result."
A Call to Capture the Cosmos: Preserving Our View of the Night Sky
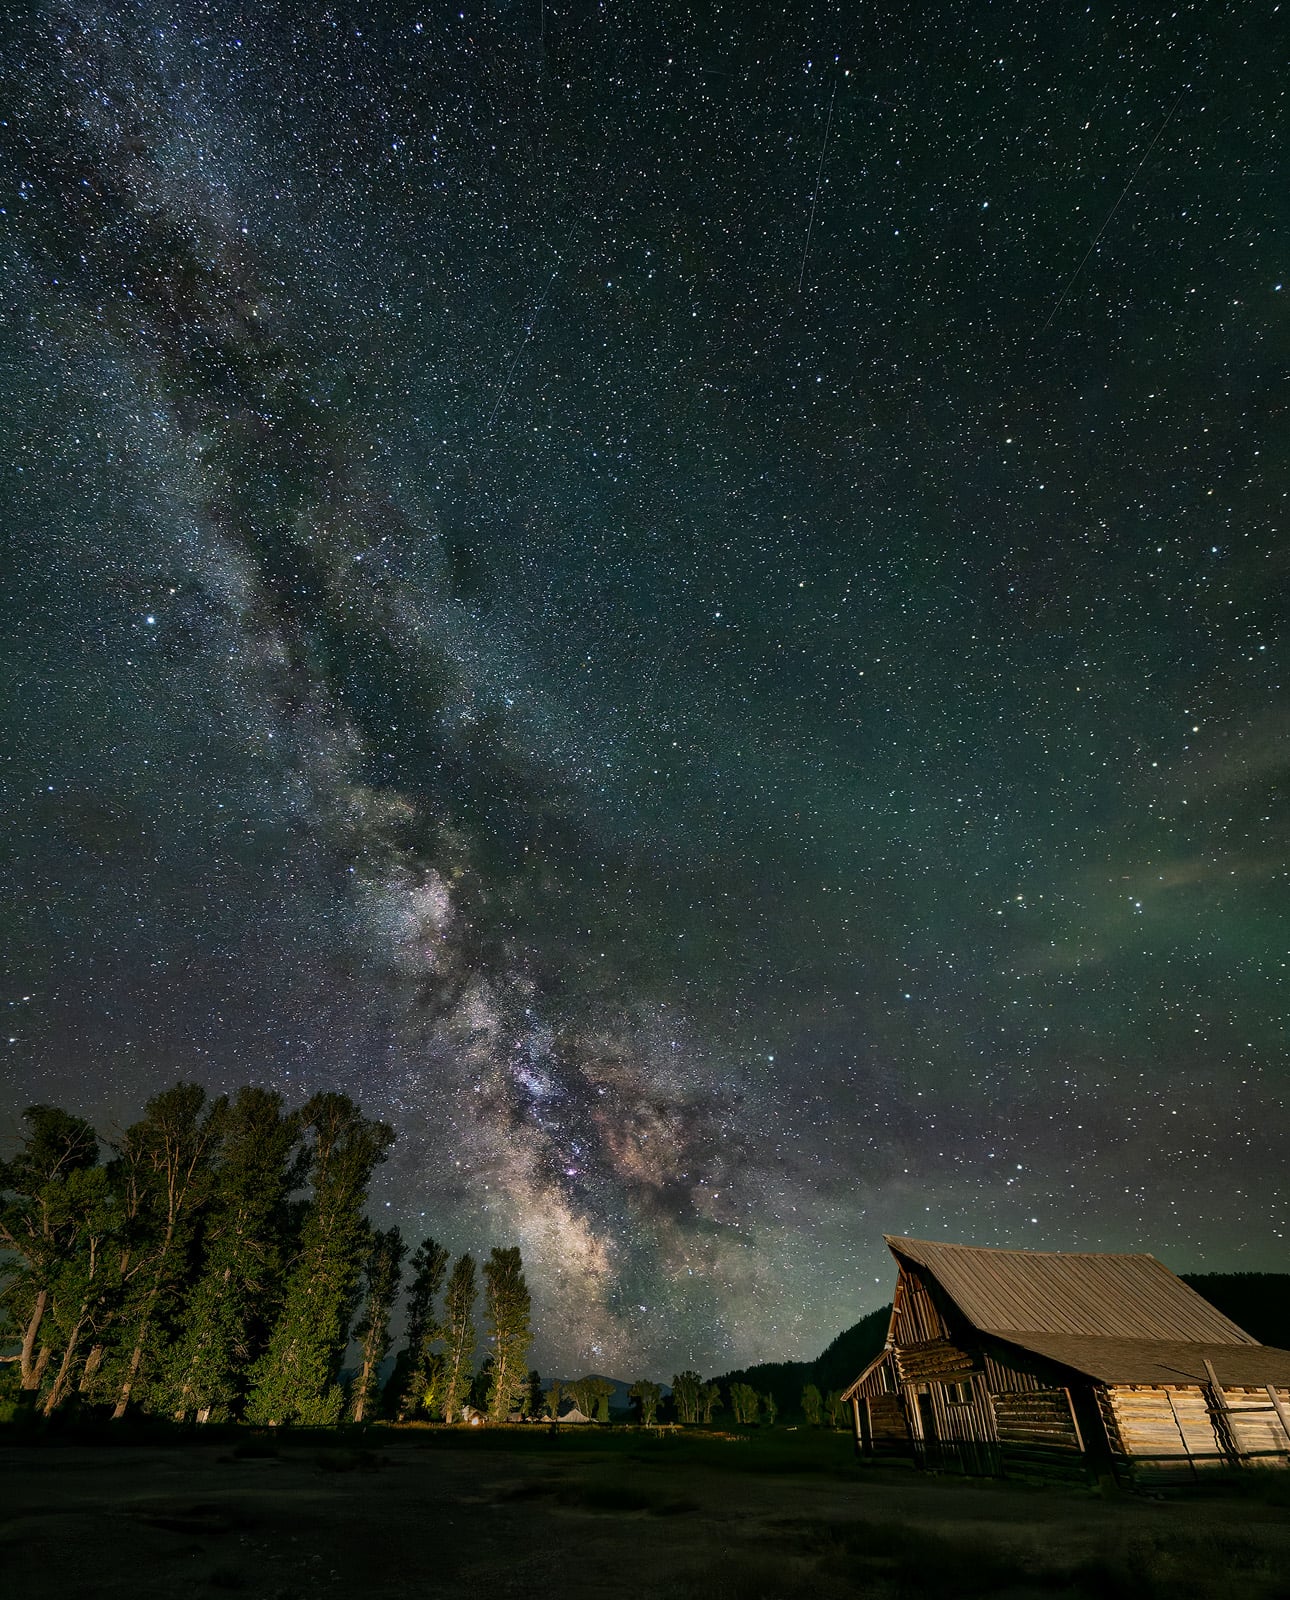
Suess’s fascination with the night sky began in his youth, long before he could witness the Milky Way in its full glory. "I had a black and white darkroom when I was 12 years old, taking photos of trees and landscapes close to my backyard. Back then in Connecticut, the sky was light-polluted, and I never saw the Milky Way. But sometime around my 16th birthday, I tried to aim my camera at the night sky to see what I could get. And in the prints, I was seeing colors in the stars I couldn’t see with my own eyes. Oranges and blues. Before then, I had thought all the stars were white. I instantly became addicted."
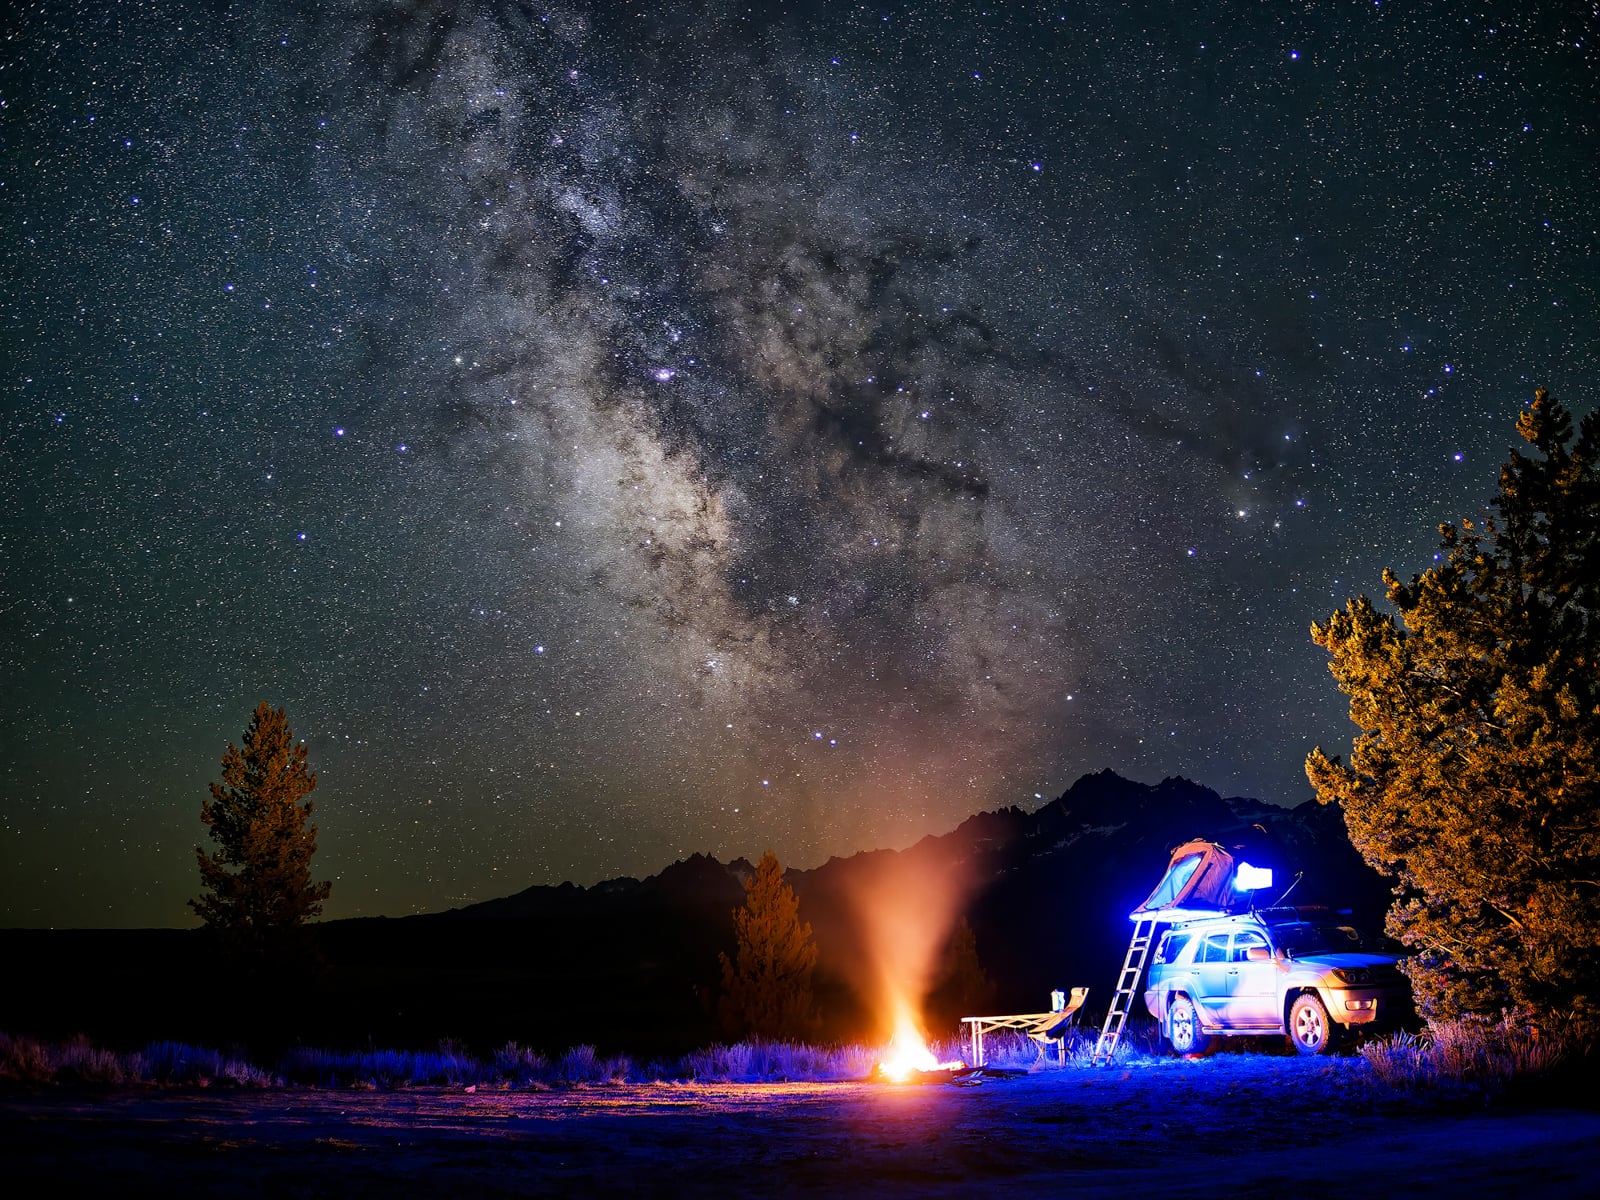
This enduring sense of wonder continues to draw him outdoors, even when comfort might suggest otherwise. "One of my favorite things to do is set up two cameras, have one doing a star trail with Live Composite and the other doing a time lapse, and then just sit down in my chair and look up. Watch the shooting stars. Imagine what’s out there. It makes you realize we’re just such a small part of this whole universe."
However, Suess expresses concern for the future accessibility of dark skies. "More satellites, more light pollution, wildfires affecting the atmosphere," he cautions. "It’s scary to think what it’ll be like in 10 or 15 years. We’re in a really good era right now where anyone can go out and enjoy this. But that window’s not going to stay open forever."
During his successful treatment for HPV-positive squamous cell oropharyngeal cancer this past winter, OM SYSTEM provided Suess with an early OM-3 ASTRO camera. Despite experiencing fatigue, he prioritized venturing outdoors on clear nights. "When you can’t go out and shoot, you start to realize how much of what you love about this has nothing to do with photos," he reflects. "It’s being out there in the quiet, cold air looking up at thousands of stars. Even if it’s millions of light-years away, I can still visit that with my camera. I missed the act of exploring the Milky Way, Andromeda Galaxy, and the Orion Nebula more than I missed the actual photos that I would take. It’s been months that I haven’t really been able to spend quality time behind the camera. I think it will be interesting, looking up at that night sky again and probably seeing it a little bit differently than I used to."
Further insights from Matt Suess can be explored on his website, Facebook, YouTube, and Instagram.
Image Credits: Matt Suess
This article was brought to you by OM SYSTEM.


